jQuery Grid Data with jqGrid
Posted by Jack Altiere on April 27th, 2010Creating a grid of data is a common task when building a dynamic website. I recently started looking for a good grid component that would play nice with both JQuery and ASP.NET MVC. The solution I ended up with is jqGrid. I’m going to walk through a simple example of setting up a grid and populating it via JSON with an MVC controller. I’ll also show how to add, edit and delete rows to the grid.
Setup
First, I created a simple User table and generated my Linq to SQL classes. I just want to show a simple grid of users, showing ID, First Name, Last Name, Email address and Birthday. When we are done, the finished grid will look something like this:
One thing that I like about this grid is that it supports jQuery UI right out of the box. After downloading jQuery UI and jqGrid and following the installation instructions, just reference the relevent .css and .js files to get started, which I did in a master page:
<link href="../../Content/jquery-ui-1.8.custom.css" rel="Stylesheet" type="text/css" />
<link href="../../Content/ui.jqgrid.css" rel="Stylesheet" type="text/css" />
<script src="http://ajax.microsoft.com/ajax/jquery/jquery-1.4.2.min.js" type="text/javascript"></script>
<script src="../../Scripts/jquery-ui-1.8.custom.min.js" type="text/javascript" ></script>
<script src="../../Scripts/grid.locale-en.js" type="text/javascript"></script>
<script src="../../Scripts/jquery.jqGrid.min.js" type="text/javascript"></script>
<script src="../../Scripts/grid.custom.js" type="text/javascript"></script>
HTML
The first thing I want to do is set up my grid on the client site. This requires two parts. The first is the HTML landing spot for the grid, pager and search box, which looks like this:
<div id="search"></div>
<table id="grid" class="scroll" cellpadding="0" cellspacing="0"></table>
<div id="pager" class="scroll" style="text-align:center;"></div>
Javascript
The next part is the Javascript that takes care of configuring our grid and hooking it up to the HTML elements on the page.
    $(document).ready(function() {
        jQuery("#grid").jqGrid({
            url: '/Home/SampleGridData/',
            datatype: 'json',
            mtype: 'POST',
            colNames: ['Id', 'First Name', 'Last Name', 'Email', 'Birthday'],
            colModel: [
              { name: 'UserID', index: 'UserID', width: 60, align: 'center', editable: true, editrules: { edithidden: false} },
              { name: 'FirstName', index: 'FirstName', width: 200, align: 'center', sortable: true, editable: true, edittype: 'text', editrules: { required: true} },
              { name: 'LastName', index: 'LastName', width: 200, align: 'center', sortable: true, editable: true, edittype: 'text', editrules: { required: true} },
              { name: 'Email', index: 'Email', width: 200, align: 'center', sortable: true, editable: true, edittype: 'text', editrules: { required: true, email: true} },
              { name: 'Birthday', index: 'Birthday', width: 200, align: 'center', sortable: true, editable: true, editrules: { required: true }
            ],
            pager: jQuery('#pager'),
            rowNum: 10,
            rowList: [5, 10, 20, 50],
            sortname: 'UserID',
            sortorder: "asc",
            viewrecords: true,
            imgpath: '/Content/Images',
            caption: 'JqGrid Sample',
            scrollOffset: 0
        });

        jQuery("#grid").jqGrid('navGrid', '#pager',
            { edit: true, add: true, del: true, search: false },
            { url: "/Home/EditSampleGrid", closeAfterEdit: true, beforeShowForm: function(formid) { $("#tr_UserID", formid).hide(); $("#Birthday").datepicker(); } },
            { url: "/Home/AddSampleGrid", closeAfterAdd: true, beforeShowForm: function(formid) { $("#tr_UserID", formid).hide(); $("#Birthday").datepicker(); } },
            { url: "/Home/DeleteSampleGrid" }, {});

        $("#search").filterGrid("#grid", {
            gridModel: false,
            filterModel: [{
                label: 'Search',
                name: 'search',
                stype: 'text'
            }]
       });
 });
This really isn’t as bad as it looks. Once you start getting into jqGrid, I suggest spending some time getting familiar with the wiki, I spent a lot of time there learning how the plugin works. I will explain some of the important pieces. First, the url above is set to /Home/SampleGridData. This means that I have a method in my home controller called SampleGridData that is supplying me with the data to fill the grid. The format that jqGrid expects is pretty particuliar, you can see from the documentation what is expected.
Grid Configuration
There are a lot of options available to configure in the grid. I want to quickly touch on some of the options I used in this sample. A lot of your configuration is going to happen in the colModel section. Here you can set up the width of your fields, the data types, etc. More importantly, you can set up which columns are hidden, and what the validation rules are for your columns. I didn’t show it, but you can also set up custom field validation as well as custom data formatting rules. I used the editrules section for each column to mark any fields as required that I wanted, and I also took advantage of being able to set up my Email field as type ‘email’’. This allows the grid to check to see if the input is in the correct format. You can also make any column sortable by just applying the sortable: true parameter.
C#
This method is what I’m using to initially load the grid data. As you can see, the code is fairly straight forward:
public ActionResult SampleGridData(string sidx, string sord, int page, int rows, string search)
{
    var db = new BlogSamplesDataContext();

    var pageIndex = Convert.ToInt32(page) - 1;
    var pageSize = rows;
    var totalRecords = db.Users.Count();
    var totalPages = (int)Math.Ceiling(totalRecords / (float)pageSize);

    // This is possible because I'm using the LINQ Dynamic Query Library
    var users = db.Users
            .OrderBy(sidx + " " + sord)
            .Skip(pageIndex * pageSize)
            .Take(pageSize).AsQueryable();

    var jsonData = new
    {
        total = totalPages,
        page = page,
        records = totalRecords,
        rows = (
            from User u in users
            select new {
                i = u.UserID,
                cell = new[] { u.UserID.ToString(), u.FirstName, u.LastName, u.Email, u.Birthday.Value.ToShortDateString() }
        }).ToArray()
    };

    return Json(jsonData);
}
For the sake of the example I’m doing everything in the controller rather than implementing a repository, which I would normally do. One thing to point out, I did not choose the parameter names in this method. (with the exception of search, but we’ll get to that later) This is the data that jqGrid is going to post to my controller to handle sorting, paging, filtering, etc.
You may notice above that my OrderBy statement is taking a string parameter. This is possible through the LINQ Dynamic Query Library, which allows you to use string based expressions rather than type safe Lambda expressions in your queries. Using this library allows me to use the sorting and ordering columns that are passed in from the grid directly. Make sure that your client indexes match your database column names or this will not work!
Adding A Record
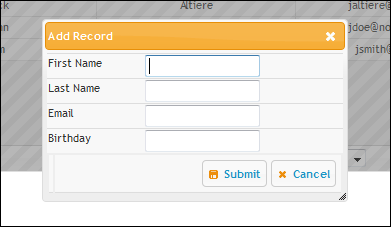
Now that the grid is successfully loading data, the next step is adding records from the grid. This actually isn’t very hard using jqGrid. If you press the Add icon in the bottom left of the grid, you will be presented with a dialog with all the fields set up, like this one:
This form is constructed using the properties set up in the ‘colModel’ section of the grid call. Every field set up with the property of editable: true will be displayed on this form. If you notice, the ID field is not showing up in this example, although it was marked as an editable field in my grid setup. The reason for this is that I wanted to send the UserID to the controller, but I didn’t want the user to be able to edit it. To accomplish this, I added a little bit of jQuery to my grid setup and hid the column. At the same time, I leveraged jQuery UI and made my Birthday field a datepicker. I handled both of these things using the beforeShowForm event available in the grid.
{ url: "/Home/EditSampleGrid", closeAfterEdit: true, beforeShowForm: function(formid) { $("#tr_UserID", formid).hide(); $("#Birthday").datepicker(); } },
{ url: "/Home/AddSampleGrid", closeAfterAdd: true, beforeShowForm: function(formid) { $("#tr_UserID", formid).hide(); $("#Birthday").datepicker(); } },
The grid assigns ID’s in this way according to your column indexes. Since my ID field is named UserID, I can access it’s row with the selector of $(“#tr_UserID”) and my birthday textbox with the selector of $(“#Birthday”). As you can see from the client code, I’m setting up a method in my Home controller called AddSampleGrid to process my grid data.
public ActionResult AddSampleGrid(string FirstName, string LastName, string Email, string Birthday)
{
    try
    {
        var db = new BlogSamplesDataContext();

        DateTime bDay;
        if (!DateTime.TryParse(Birthday, out bDay))
            bDay = DateTime.MinValue;

        var user = new User
                       {
                           FirstName = FirstName,
                           LastName = LastName,
                           Email = Email,
                           Birthday = bDay
                       };

        db.Users.InsertOnSubmit(user);
        db.SubmitChanges();

        return Json(true);
    }
    catch (Exception)
    {
        // Do some error logging stuff, handle exception, etc.
        return Json(false);
    }
}
The grid will pass the parameters according to their name on the colModel, so catching them and setting them up is a breeze.
Editing a Record
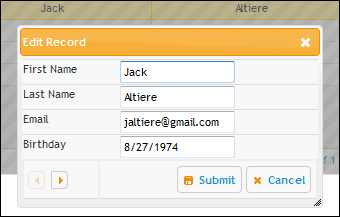
Editing a record is basically the same process as adding, the only difference is that you are sending the ID along with the rest of the data. You could easily combine the two operations into the same controller method if you want, although I normally separate them. I’m using the same trick to hide the ID field from the edit form, but the key here is that it’s actually being sent to the controller so we can use it to figure out which record is being edited.
The dialog for editing records is nice in jqGrid. It allows you to edit the highlighted row, and you can also use the navigation errors on the bottom left of the dialog to cycle between records.
The controller method for editing a record is similar to the add method, we just have to load the correct user and edit the fields as shown here.
public ActionResult EditSampleGrid(int UserID, string FirstName, string LastName, string Email, string Birthday)
{
    try
    {
        var db = new BlogSamplesDataContext();

        DateTime bDay;
        if (!DateTime.TryParse(Birthday, out bDay))
            bDay = DateTime.MinValue;

        var query = from u in db.Users
                    where u.UserID.Equals(UserID)
                    select u;

        var user = query.First();
        user.FirstName = FirstName;
        user.LastName = LastName;
        user.Email = Email;
        user.Birthday = bDay;

        db.SubmitChanges();

        return Json(true);
    }
    catch (Exception)
    {
        // Do some error logging stuff, handle exception, etc.
        return Json(false);
    }
}
If you notice, I’m passing the birthday as a string. This is intentional, I just find that this makes dealing with dates much easier because you don’t have to convert between a Javascript date and a .NET date.
Deleting a Record
Deleting a record is trivial with jqGrid. The grid will pass a parameter called id, and you can use that to delete the record in question in your controller.
public ActionResult DeleteSampleGrid(int id)
{
    try
    {
        var db = new BlogSamplesDataContext();
        var query = from u in db.Users
                    where u.UserID.Equals(id)
                    select u;

        var user = query.First();

        db.Users.DeleteOnSubmit(user);
        db.SubmitChanges();

        return Json(true);
    }
    catch (Exception)
    {
        // Do some error logging stuff, handle exception, etc.
        return Json(false);
    }
}
Filtering
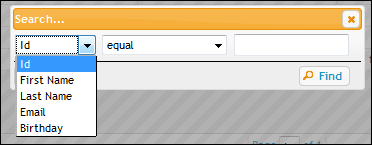
The last part I want to talk about is implementing a grid filter. Out of the box, the grid supports a filter that allows you to search specific fields. You can see an example of this here:
While this is nice, I generally like to implement a more generic filter. I want the user to just have to type in what they are looking for, and I’ll search all the relevant fields. This is pretty easy, and it’s what I was using the search parameter for in the original SampleGridData method. With just a quick check to see if I have a search string and a minor modification to the data call, I can quickly filter the grid on any field I want to.
if (!string.IsNullOrEmpty(search))
{
    // This is possible because I'm using the LINQ Dynamic Query Library
    var users = (from u in db.Users
             where u.FirstName.Contains(search)
                       || u.LastName.Contains(search)
                       || u.Email.Contains(search)
             select u).OrderBy(sidx + " " + sord)
                      .Skip(pageIndex*pageSize)
                      .Take(pageSize)
                      .AsQueryable();

    var totalRecords = users.Count();
    var totalPages = (int)Math.Ceiling(totalRecords / (float)pageSize);
}
If this is the way you want to go, be sure to turn off the default search parameter. You can toggle all of the icons on the bottom left through these grid options:
jQuery("#grid").jqGrid('navGrid', '#pager',
{ edit: true, add: true, del: true, search: false },
Final Thoughts
All in all, I feel that jqGrid is a nice plugin that allows you to quickly and easily set up grid data on your site. If you are already using jQuery UI, the fact that this grid integrates well with it is just icing on the cake. I’ve only scratched the surface with what is possible using this plugin, so be sure to check out the product wiki. The good news is that this product is well documented, and there are a lot of examples available to get you up and going.


Recent Comments